BackTrack 5 Revolution

As BackTrack 5 development rolls on full steam ahead, we’ve been getting numerous questions about the future release. We thought we’d publish a blog post with general information about BT5 for the impatient

ETHICAL HACKING COURSE

DEF CON 18 was a resounding success! With more contests, events, attendance and talks, this year's show was a fitting end to our years at the Riviera! We'd like to thank the Riv for working with and hosting us for 5 .

Hackers Heroes of the Computer Revolution

A classic reissued for the first time in trade paperback with a new afterword from the author this is the story of the true pioneers of the computer revolution--the young mavericks and renegades who hacked their way into.

Windows 7 All In One 33 in 1 Fully Activated

Windows 7 is the easiest, fastest, and most engaging version of Windows yet. Better ways to find and manage files, like Jump Lists and improved taskbar previews, help you speed through everyday tasks. Faster .

Backtrack Hacking full DVD Tutorials

Backtrack Hacking Full DVD Tutorials And Bonus Hacking video Size: 6.32 GB Network Hacking,Wireless Hacking,Phone Phreaking and mach more.

Showing posts with label Backtrack 5. Show all posts

Monday, July 25, 2011

Hacking Windows Using Social Engineering Toolkit and Backtrack 5

What is Social Engineering Toolkit ?
The Social-Engineer Toolkit (SET) is specifically designed to perform advanced attacks against the human element. SET was designed to be released with the http://www.social-engineer.org launch and has quickly became a standard tool in a penetration testers arsenal. SET was written by David Kennedy (ReL1K) and with a lot of help from the community it has incorporated attacks never before seen in an exploitation toolset. The attacks built into the toolkit are designed to be targeted and focused attacks against a person or organization used during a penetration test.


Actually this hacking method will works perfectly with DNS spoofing or Man in the Middle Attack method. Here in this tutorial I’m only write how-to and step-by-step to perform the basic attack, but for the rest you can modified it with your own imagination.  


In this tutorial we will see how this attack methods can owned your computer in just a few steps…
The success possibility of this attack depend on victim browser. If the victim never update their browser, the possibility can be 85% or more. 


Requirement : 
1.  Backtrack 5 or Backtrack 4


Step By Step : 
1. Change your work directory into /pentest/exploits/set/ 


2. Open Social Engineering Toolkit (SET) ./set and then choose "Website Attack Vectors" because we will attack victim via internet browser. Also in this attack we will attack via website generated by Social Engineering Toolkit to open by victim, so choose "Website Attack Vectors" for this options. 


3. Usually when user open a website, sometimes they don't think that they are opening suspicious website that including malicious script to harm their computer. In this option we will choose "The Metasploit Browser Exploit Method" because we will attack via victim browser. 


4. The next step just choose "Web Templates", because we will use the most famous website around the world that already provided by this Social Engineering Toolkit tools. 


5. There are 4 website templates Ready To Use for this attack methods, such as GMail, Google, Facebook, and Twitter. In this tutorial I will use Google, but if you think Facebook or Twitter more better because it's the most accessed website, just change into what do you want. 


6. For the next step…because we didn't know what kind of vulnerability that successfully attack the victim and what type of browser, etc, in this option we just choose "Metasploit Browser Autopwn" to load all vulnerability Social Engineering Toolkit known. This tools will launch all exploit in Social Engineering Toolkit database. 


7. For payload options selection I prefer the most use Windows Shell Reverse_TCP, but you also can choose the other payload that most comfortable for you. 


8. The next step is set up the Connect back port to attacker computer. In this example I use port 4444, but you can change to 1234, 4321, etc 


9. The next step just wait until all process completed and also wait until the server running. 


10. When the link given to user, the victim will see looks-a-like Google (fake website). When the page loads it also load all malicious script to attack victim computer. 


11. In attacker computer if there's any vulnerability in victim computer browser it will return sessions value that mean the exploit successfully attacking victim computer. In this case the exploit create new fake process named "Notepad.exe". 


12. To view active sessions that already opened by the exploit type "sessions -l" for listing an active sessions. Take a look to the ID…we will use that ID to connect to victim computer. 


13. To interract and connect to victim computer use command "sessions -i ID". ID is numerical value that given when you do sessions -l. For example you can see example in picture below. 


14. Victim computer already owned. I'm practice to create this tutorial using Virtual Machine so it will not harm other computer and also you can doing a lot of experience with your OS.

Monday, July 18, 2011

10 Steps to Set Up Armitage in Backtrack for Penetration Test


What is Armitage?
Armitage exists to help security professionals better understand the hacking process and appreciate what's possible with the powerful Metasploit framework. Security professionals who understand hacking will make better decisions to protect you and your information." I copy that paragraph from Fast and Easy Hacking FAQ, but in a simple way to explain what is Armitage, in my opinion it's tools that make you learning about Netowork Security, Metasploit, and NMap more easier because this tools make all of that tools(Metasploit, NMap) in visual way not a command line. Just a few click and you will know the flow of an attack happen in the network.


Read here for latest Backtrack 5 Armitage tutorial. 


Requirement : 
1. Backtrack 4r2 
2. Armitage (apt-get install armitage from your Backtrack Box) 
3. Java 1.6.0+ 
4. Metasploit 3.5+ 
5. Database (PostgreSQL , MySQL) –> In this tutorial we use MySQL; PostgreSQL usually used when you use Backtrack 4r1   


Step By Step : 
If you still unfamiliar with Backtrack, you can read my previous post about 5 useful things in Backtrack Linux. 
1. I assume you have already installing Armitage by using apt-get install armitage. The next step is update your metasploit to the latest version by using msfupdate command. This is needed to update our exploit database to the latest version. 
v4L@bt:~# /pentest/exploits/framework3/msfupdate 


2. The next step is enabling RPC Daemon for metasploit, in this case we will use SSL to interact with metasploit. 
v4L@bt:~# /pentest/exploits/framework3/msfrpcd -f -U msf -P test -t Basic 
The above command will start the msfrpcd with the user msf, password test, SSL listener, on the default port 55553. 


3. After setting up the MSRPC Daemon, the next step is turn on our database service (I will use MySQL) 
v4L@bt:~# /etc/init.d/mysql start 


4. The step 1-3 is the needed step to make sure Armitage running correctly without error. If everything is okay, the next step is run the Armitage inside /pentest/exploits/armitage/, so we need to change the directory first. 
v4L@bt:~# cd /pentest/exploits/armitage/ v4L@bt:/pentest/exploits/armitage# ./armitage.sh

5. After the ./armitage.sh command, there's should appear new window to connect to MySQL and mysql msfrpcd. Make sure everything is correct and also check the Use SSL checklist. If everything is OK, click CONNECT. 


6. Here's the main window of Armitage, at the top of application there's a menu, on the left side there's auxiliary, exploits, and payload from metasploit, and at the bottom of application there's MSFConsole. 


7. The next step we need to add host(s). We also can use NMap to scan whole network or specific IP Address. In this case I will use "Quick Scan(OS Detect)" using NMap to find alive hosts in my network. 


My network address is 192.168.1.0/24 class C. 


You need to wait until the tasks completed. Usually it depends on scanning type, if you use intense scan will take more time than quick scan. Below is the picture when it finish doing the task.

If the tools found alive hosts it will be shown like the picture below(also the OS).

8. From the previous image it shows that we need to find some attacks available for the listed hosts. 


You can use automated attack finder from armitage who will find the most suitable attacks for the hosts listed. you can choose both "by Port" or "by Vulnerability". If attack analysis has finished the application will inform you like the picture below.

9. In this example I will try the MS08_067 vulnerability in Windows.

The next step is the same when you use metasploit framework. If you confused in this steps, you can use automated exploitation (leave all the options default), then click LAUNCH and wait.

10. If the targeted hosts is vulnerable with the attack, the color will be changed into red, that's mean that we can breach into the computer.

The next step is right click the hosts and as you can see on the above picture, I choose the command shell to interact with the victim. I think you should know what happen next when I click that option PWNED. 


I hope this tutorial is useful for you, especially for you who want to tests your personal network from security breach by using metasploit.

Sunday, July 17, 2011

NMAP TUTORIAL | COMMAND LINE

I’ve just installed Linux on PC and I’m already having fun with it.
So today I’ll be showing you how to use Nmap to scan and suck the information of the target 
usingthe tools commands. 

First of all you’ll need:

1) A Linux OS (Any Distro)(I’m using Mint Linux)
2) Nmap
If you don’t have Nmap installed don’t worry, Just open the terminal and type the command:
sudo apt-get install nmap
This will install Nmap. Now open a second tab and launch Nmap by typing “nmap”.
This will open a whole list of useful information read them line by line and understand the function of each command.
Now to the tutorial. First choose your target, it can be a Remote PC of your friend or a Web Server about which you want to get information about.
Now if you want to find out what type of OS your target is using then, Open a new Tab in the Terminal and type the following command:
nmap -v -A -O Target IP 
Actually this command carries more then one function. It detects all the open Ports, The server OS, which is the  “-O”
Now when you are done typing the command and the target, Press enter and let Nmap do it’s magic.
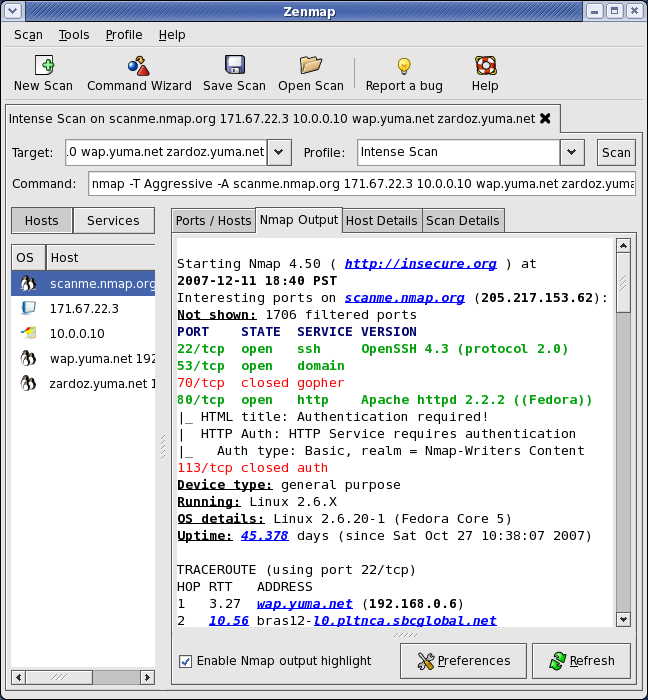
After the work is done you’ll get a similar output:
Don’t worry with the images. I’ve split them into three parts actually they are the result of the same scan.
Now as you can see in the pictures that Nmap has generated alot of useful information that might help a hacker exploit the site as well as help a security dude  save his site by observing the open ports and restricting their access. You can see that Nmap has also given the OS of the server which in the above picture is “Linux”. It has also listed many open and vulnerable ports + SSH and SSL secure ports.
This ends my Nmap tutorial. Next time I’ll be posting a tutorial on hacking a remote PC with Nmap + Metasploit.

Related Posts Plugin for WordPress, Blogger...

Share

Twitter Delicious Facebook Digg Stumbleupon Favorites More

Enter your email address:

Delivered by FeedBurner